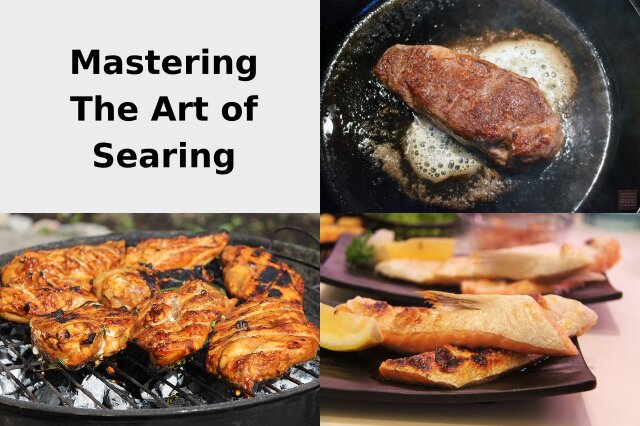
Searing is a cooking technique that involves browning the surface of food at high temperatures to develop rich flavours and impart a beautiful caramelisation.
By following our step-by-step instructions and utilizing the right tools and ingredients, you’ll be able to achieve the same delectable results that you usually only find at your favourite restaurant.
From perfectly seared steaks and crispy-skinned fish to golden-brown vegetables, your taste buds are in for a treat.
So, roll up your sleeves and get ready to elevate your culinary skills to a whole new level.
Get ready to impress your family and friends with your newfound ability to create succulent, flavourful meals that rival any top chef’s.
Let’s dive into the world of sear cooking and unleash those restaurant-quality flavours in your own kitchen!
[lwptoc]
Searing is a cooking technique that involves browning the surface of food at high temperatures to develop rich flavours and impart a beautiful caramelisation.
This process not only enhances the taste and aroma of your dishes but also adds a visually appealing crust that is sure to impress your guests.
When you sear your meat, it creates a Maillard reaction, a chemical process that occurs when amino acids and sugars react to produce hundreds of different flavour compounds.
This reaction results in the complex and savoury flavours that are often associated with restaurant-quality dishes.
Additionally, sear cooking helps retain the natural juices and moisture of the meat, resulting in a tender and succulent texture.
The high heat used in searing creates a seal on the surface of the meat, preventing the juices from escaping during the cooking process.
Tools and equipment for sear cooking.
To achieve the best results in sear cooking, it’s important to have the right tools and equipment.
Here are some essential items you’ll need:
Cast iron skillet:
A cast iron skillet is ideal for sear cooking as it retains heat well and distributes it evenly.
This type of skillet allows for high-temperature cooking, which is crucial for achieving a perfect sear.
Tongs:
Tongs are essential for flipping and maneuvering your food during the searing process.
Opt for a pair of sturdy tongs that provide a good grip.
Oil with a high smoke point:
To achieve a proper sear, you’ll need an oil with a high smoke point, such as canola or avocado oil.
These oils can withstand high temperatures without burning, ensuring a successful searing process.
Meat thermometer:
A meat thermometer is essential for ensuring that your meat is cooked to the desired level of doneness.
This tool allows you to monitor the internal temperature of the meat and avoid overcooking.
Why You Should Use a ChefsTemp Thermometer When Cooking
A ChefsTemp thermometer is an essential tool for any cook or baker.
It allows you to monitor the internal temperature of your food more accurately, which helps you achieve consistent results and perfect textures.
Additionally, it can be used to make sure that food has reached safe temperatures, ensuring that it's safe to eat.
Unlike other thermometers, the ChefsTemp reads quickly and accurately in both Celsius and Fahrenheit.
Description:Professional thermocouple probe sensor with 1 second reading time, this pocket size kitchen gadget is suitable for both professional chefs and home cooks. Pocket Pro is another amazing innovation from ChefsTemp. It is a 4-way rotating display thermometer,
Description:Finaltouch X10 is the Winner of Red Dot Product Design in 2022. The Red Dot Design Award is one of the three most prestigious professional design competitions in the world. Winning the award proves its the Leader in Design and Technology. Chefs around the
Description:Quad XPro is designed to track temperatures over an extended period of time with moderate-heat cooking methods, such as smoking, oven-roasting, deep-frying, home brewing, and Sous Vide and to be used while grilling.
Price: $109.99
Heat-resistant spatula:
A heat-resistant spatula is useful for scraping off any caramelised bits that may stick to the pan during searing.
Choosing the right cuts of meat for sear cooking.
Not all cuts of meat are suitable for sear cooking.
Here are some cuts that work best:
Steak:
Thick cuts of steak, such as ribeye, rump, striploin, or filet mignon, are perfect for searing.
These cuts have enough fat marbling, which adds flavour and prevents the meat from drying out during cooking.
Pork chops:
Thick-cut pork chops are ideal for sear cooking.
The fat content and thickness of the meat help it retain moisture and develop a flavourful crust.
Chicken thighs:
Chicken thighs, with their higher fat content, are more forgiving when it comes to searing.
They remain juicy and tender even after high-temperature cooking.
Fish fillets:
Fish fillets with firm flesh, such as salmon or tuna, are great candidates for sear cooking.
The high heat creates a crispy exterior while keeping the inside moist and flaky.
Preparing the meat for sear cooking.
Before you start searing your meat, it’s important to properly prepare it.
Follow these steps for the best results:
Bring the meat to room temperature:
Allow the meat to sit at room temperature for about 30 minutes before cooking.
This ensures even cooking throughout the meat.
Pat the meat dry:
Use a paper towel to pat the meat dry.
Moisture on the surface can hinder the searing process, so it’s important to remove any excess moisture.
Season the meat:
Season the meat generously with salt and pepper or your preferred seasoning.
This helps enhance the flavours and forms a delicious crust during searing.
Searing techniques for different types of meat.
Each type of meat requires a slightly different searing technique.
Here’s how to achieve the perfect sear for different meats:
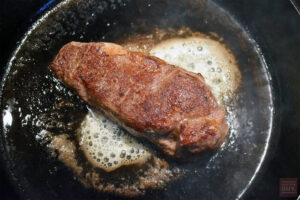
Steak:
Searing Steak.
Preheat your cast iron skillet over high heat until it’s smoking hot.
Add oil to the skillet and carefully place the steak in the pan.
Allow the steak to cook undisturbed for a few minutes until a golden-brown crust forms.
Flip the steak and repeat the process for the other side.
Adjust the cooking time based on your desired level of doneness.
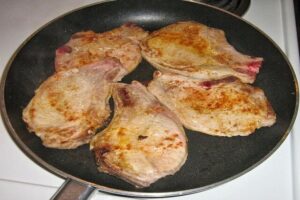
Pork chops:
Searing Pork Chops,Follow the same steps as searing steak.
However, pork chops may require a slightly longer cooking time to ensure they’re fully cooked.
Chicken thighs:
Searing Chicken thighs.
Start by searing the chicken thighs skin side down in a hot skillet with oil.
Allow the skin to crisp up and turn golden brown before flipping the chicken over to finish cooking.
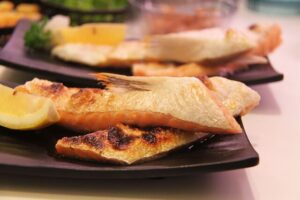
Fish fillets:
Searing fish fillets.
Pat the fish fillets dry and season them.
Preheat the skillet over medium-high heat and add oil.
Place the fillets in the skillet, skin side down, and cook until the skin is crispy.
Flip the fillets and cook for a few more minutes until they’re cooked through.
Sear cooking tips and tricks.
To take your sear cooking skills to the next level, here are some tips and tricks to keep in mind:
Don’t overcrowd the pan:
When searing meat, it’s important not to overcrowd the pan.
This ensures that the heat is evenly distributed and allows for proper browning.
Let the meat rest:
After searing, allow the meat to rest for a few minutes before slicing.
This allows the juices to redistribute, resulting in a more tender and flavourful final dish.
Use a meat thermometer:
To achieve your desired level of doneness, use a meat thermometer to check the internal temperature of the meat.
Experiment with seasonings:
Don’t be afraid to experiment with different seasonings and marinades to enhance the flavours of your seared dishes.
Practice patience:
Achieving the perfect sear takes practice. Don’t rush the process and allow the meat to develop a beautiful crust.
Recipes and meal ideas using sear cooking.
Now that you have mastered the art of sear cooking, let’s explore some delicious recipes and meal ideas:
Pan-Seared Ribeye Steak:
Season a thick-cut ribeye steak with salt and pepper.
Sear it in a hot skillet for a few minutes on each side.
Finish it off in the oven for the desired level of doneness.
Crispy Skin Salmon:
Season a skin-on salmon fillet with salt and pepper.
Sear it in a hot skillet, skin side down, until the skin is crispy.
Flip the fillet and cook until it’s cooked through.
Seared Chicken Thighs with Lemon-Herb Sauce:
Season chicken thighs with your favourite herbs and spices.
Sear them in a hot skillet until the skin is golden brown.
Finish cooking in the oven and serve with a tangy lemon-herb sauce.
Seared Pork Chops with Apple Chutney:
Season thick-cut pork chops with salt and pepper.
Sear them in a hot skillet until they develop a golden-brown crust.
Serve with a homemade apple chutney for a sweet and savoury flavour combination.
Common mistakes to avoid in sear cooking.
While sear cooking is a relatively simple technique, there are some common mistakes to avoid:
Using a nonstick pan:
Nonstick pans are not ideal for sear cooking as they don’t get hot enough to achieve a proper sear.
Not preheating the skillet:
Ensure that your skillet is preheated properly before adding the meat. This allows for a quick and even sear.
Moving the meat too soon:
To develop a crust, allow the meat to cook undisturbed for a few minutes before flipping or moving it.
Overcrowding the pan:
Overcrowding the pan prevents proper browning and can result in steaming the meat instead of searing it.
Conclusion:
Elevate your cooking skills with sear cooking.
Congratulations! You’ve now learned the art of sear cooking and how to unleash restaurant-quality flavours in your own kitchen.
By following the step-by-step instructions, using the right tools and ingredients, and practicing patience, you’ll be able to create succulent, flavourful meals that rival any top chef’s.
So, roll up your sleeves, gather your ingredients, and get ready to impress your family and friends with your newfound ability to create mouthwatering dishes.
With sear cooking, your taste buds are in for a treat as you elevate your culinary skills to a whole new level.
Happy searing!
Remember, practice makes perfect, so don’t be discouraged if your first attempts aren’t flawless.
Keep experimenting, refining your technique, and soon you’ll be searing like a pro.
Enjoy the journey and savour the delicious rewards of your sear cooking adventures.